Installation & Usage Guide
Everything you need to wire the board to any PS4 model, power it safely inside or outside the console, and run every operation from the EORaptor PC & mobile apps.
1 Board sections
The board is designed to be simple, organized, and small so you can read the pinout quickly and connect it to the console easily.
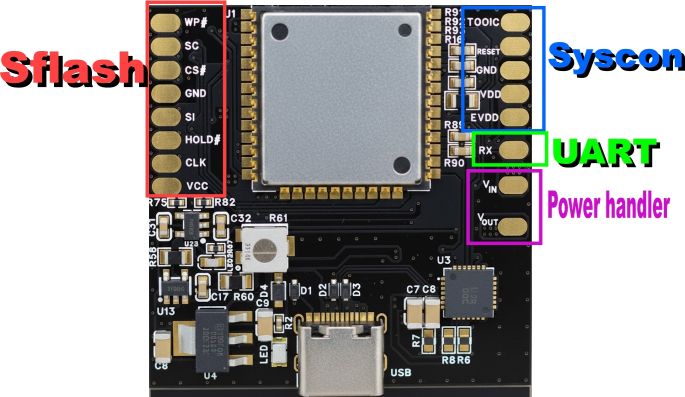
The board has 4 main sections:
- SFlash:
WP#,SO,GND,SI,HOLD#,CLK,VCC - Syscon:
TOOL0,RESET,GND,VDD,EVDD - UART:
RX - Power handler (for inside-console installs):
Vin–Vout
2 Before you start
Have these ready before you open the console:
Your board
EORaptor or MicroRaptor, with the wires for the sections you’ll use.
USB-C cable
To power the board when working outside the console.
PC or phone
Windows 10+ or Android 8+ to run the control app.
Soldering tools
Fine-tip iron, flux and thin wire for clean joints.
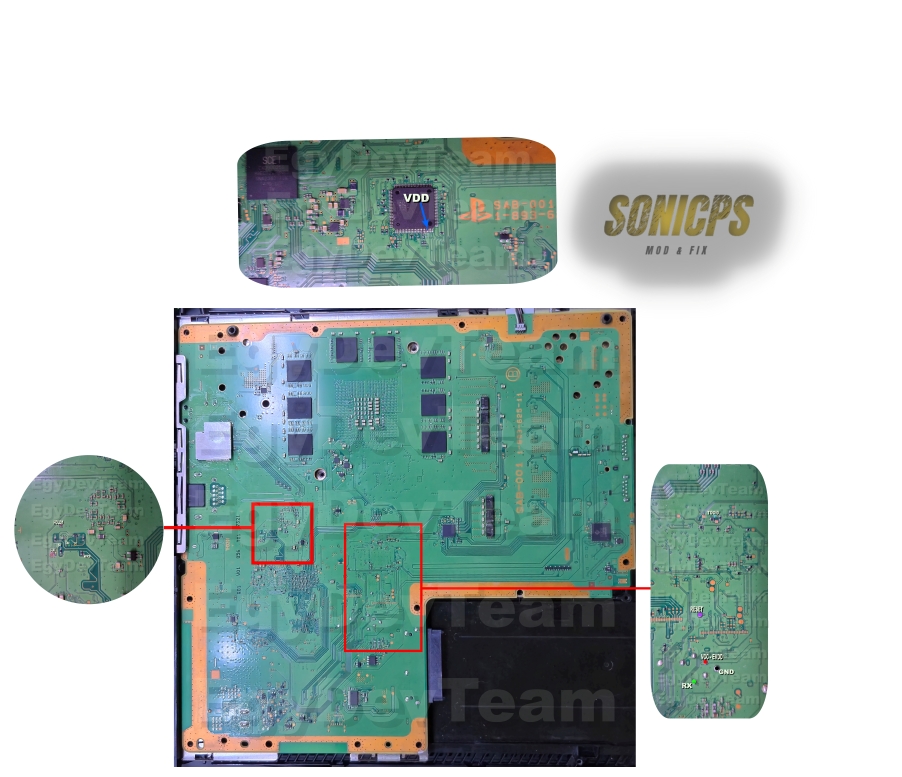
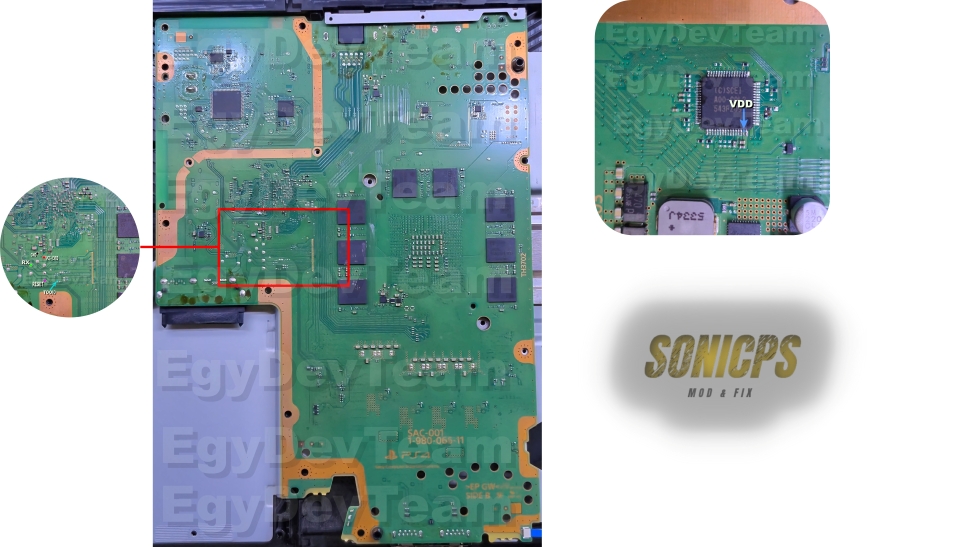
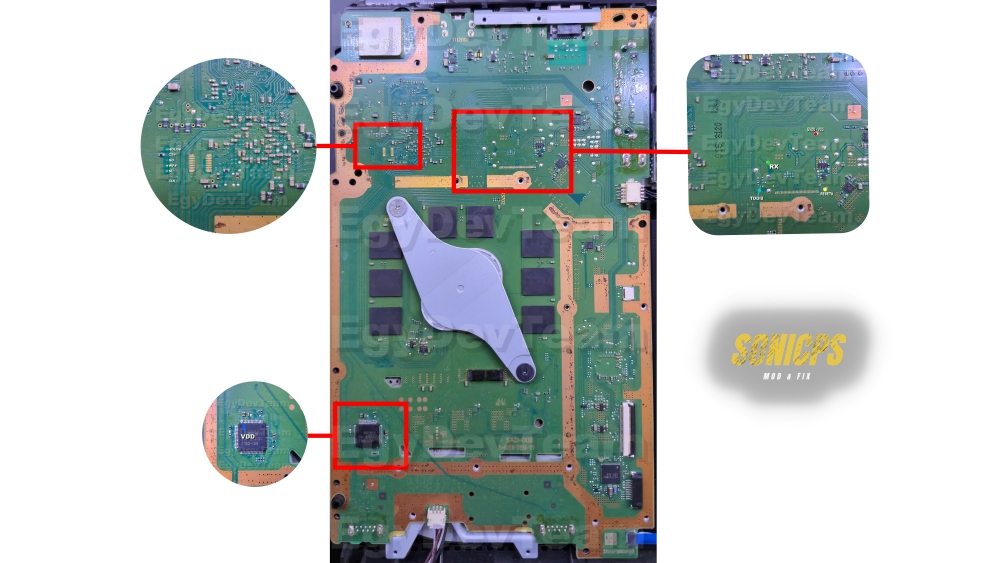
3 Wiring diagrams (by PS4 model)
The diagrams below are high-resolution. They’re shown small here to keep the page fast — click any diagram to open it big and zoom.

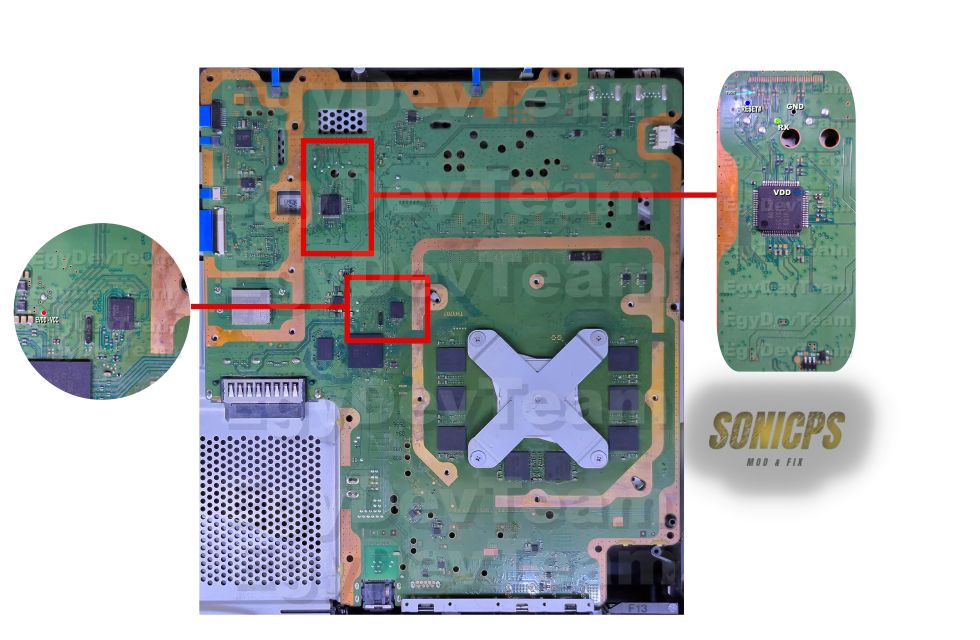
4 Syscon support & Auto Unlock
The board supports all PS4 Syscon chips except the 94xxxx family.
The board uses Auto Unlock for Syscon. In every diagram you’ll see a pin named VDD. On the first installation you must leave VDD off-board (not connected) so the board can do the unlock. After unlock, the app tells you to solder it back.
5 Installing inside the console (PSU)
When installing the board inside a PS4, cut the PSU power line and pass it through Vin → Vout on the board. Follow the picture that matches your console:
Board placement examples
Use these as a reference for where to put the board inside the console:
Vin and Vout to the PS4 PSU.
6 Powering the board
After all wires are connected, you have two ways to power the board:
- Outside the console: power using USB Type-C.
- Inside the console (Vin/Vout connected): just plug the PS4 power cable.
If everything is correct, the board’s Power LED will be red. Now you’re ready to use the app.
7 The app — first connection
The app is available for Windows and Android. If you haven’t installed it yet, grab it from the downloads section.
- Language: switch the app language.
- Info: show information about the app.
- Connection type: choose Wi-Fi (preferred) or USB (slower).
- Connect: when ready, press Connect to start.
EORaptor-xxxxxx.
8 Main screen
- Language: change UI language.
- Info: information / about.
- Flash Mode: cuts power from PSU to motherboard so the board can work without interruptions — very useful when installed inside the console. When Flash Mode is ON you cannot power on the console. To power the console, toggle Flash Mode OFF. Do not run operations while Flash Mode is OFF.
- Available modes: SFlash · Syscon · UART · Backup/Restore · Multiboot.
9 First time: unlock Syscon
The first time you connect to a console, unlock Syscon. Open the Syscon page and click Read.
10 Wiring checks & errors
The board always tests your wires before doing an operation.
- Failed to switch to Syscon → a problem on the Syscon side. Re-check Syscon wires.
- Failed to switch SFlash / Unknown Manufacturer ID / Unknown Chip ID → a problem on the SFlash wires.
11 Backup & Restore
Always make a full backup of the console first. The board makes it easy:
- Click Backup.
- Choose a folder where the backup will be saved.
- Done.
To restore, click Restore and choose the folder with your backups. The app shows the date/time and FW version for each one.
12 SFlash
To read SFlash: click Read → choose where to save → choose a file name.
To write SFlash back: click Write → select the file to write.
13 Syscon page
Click Read to get a full reading of your PS4 Syscon and save it. Click Write to write Syscon back.
14 Multiboot
Multiboot is one of the best features. Make a full backup of your current firmware and later restore it in under 4 minutes. Example:
- Console on 5.05 → backup
- Update to 9.00 → backup
- Update to 13.00 → backup
Now from Multiboot you can pick any backed-up FW and restore it quickly — go up or down any time.
- Status of current FW: shows current FW version and active slot.
- Quick backup: backs up the current FW. If already saved, it shows “Already backed up”.
- Firmware Library: all FWs available to restore. Each offers Restore · View details · Delete · Cancel.
15 UART
UART on the board is very fast. Instead of a full manual SFlash read/patch/write, it can do it in under 20 seconds so you can read UART quickly.
When you open the UART page for the first time, the app asks if you want to enable UART. Choose Yes and enable all flags.
After that click Start, then turn on the console — you’ll see the UART logs.
Stuck on a step?
Send us the exact PS4 model and the error you see — we’ll help you get it sorted.
Contact support